
Workflow Admin Manual
This document provides an overview of setting up and maintaining Advanced Task-based Workflows within Aucerna Execute. These workflows are primarily used for Well Delivery / Well Lifecycle workflows and linked to the “Job” document type. However, advanced task-based workflows are a generic capability within Aucerna Execute and available for solving a plethora of workflow related needs.
Terminology
Document Type
Records in Aucerna Execute are called “Documents.” A Document Type defines the structure (fields, rules, etc.) for a Document. Examples of Document Types in Aucerna Execute are “AFE”, “WELL”, “SITE”, “AFE_TYPE”, “PROJECT”, “USER”, …
Document
A Document is an instance of a Document Type. The Document Type defines the fields available on a Document. For example, Aucerna Execute has a Document Type “AFE,” which defines the structure of ALL AFEs in the system. Each AFE (21D001, 21C004, 08D123, …) is a unique Document, which is an instance of the AFE Document Type.
Workflow Definition
A Workflow Definition is a template that defines the structure of a workflow within Aucerna Execute. A Workflow Definition defines the Target Type and Name for a workflow and details the individual Tasks that make up that workflow.
Workflow Instance
A Workflow Instance is a running instance of a Workflow Definition bound to a particular Document (Well, AFE, Partner, …) in Aucerna Execute. Workflow Instances are typically created automatically when an Activation Rule requirement is met. Workflow Instances are “completed” when all of their Tasks are completed. In general, a Target Document can only have a single active Workflow Instance for each Workflow Definition.
Sub-workflow
Sometimes, large Workflows are broken into multiple pieces for ease of management. These pieces are called Sub-workflows.
Workflow Activation Rule
An Activation Rule is defined as part of a Workflow Definition and defines the conditions required to create new Workflow Instances automatically. Activation Rules can be used to support multiple Workflow Definitions against a single Target Type (i.e. We might have a “Drill” and “Abandonment” workflow on our “Job” document type and use an Activation Rule to pick the right workflow based on the configuration of the Job). They may also be used to delay the creation of a Workflow Instance until a status changes or a date-based milestone is met.
Target Type
The Target Type defines which Document Type (AFE, Job, Well, Site, Project, …) a Workflow Definition is associated with. A Workflow Definition can only have a single Target Type, and it can never be changed. When documents of that Target Type are created or saved, matching Workflow Definitions are evaluated to see if new Workflow Instances should be created.
Target Document
The Target Document is the specific Document (Well, Job, …) that a Workflow Instance is bound to. A Workflow Instance is only ever bound to a single Target Document and monitors that Target Document for changes in order to automatically complete Tasks and advance the workflow. The Target Document is automatically assigned when a new Workflow Instance is created, and it can never be changed.
Referenced Document
Sometimes the Target Document will reference other documents that are needed when building workflows. For example, a workflow on a drill “Job” may need to refer to lat/long information stored on the “Well” record (making the “Well” a referenced document). The relationship between Target and Reference documents are built into Aucerna Execute and can not be changed.
Task
A Workflow is composed of Tasks. Tasks are a unit of work (usually some fields that must be filled out) that can be assigned to a single user. Tasks can have dependencies on other tasks. Tasks can be configured with a Completion Rule that defines the conditions under which that task is automatically completed. Tasks can also be excluded from a Workflow Instance based on a Hide Rule (for example: if the well isn’t sour, we don’t need the workflow tasks related to H2S Safety). Tasks track information related to who is assigned that task, when it was assigned, status, and the date it was completed.
Creating a Workflow
In order to create a new workflow, you must:
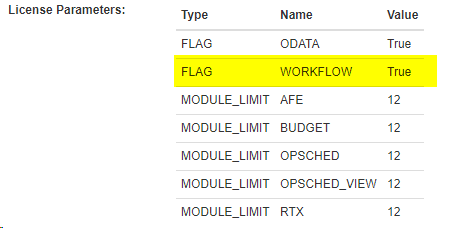
- Be licensed to use the Advanced Workflows capability. You can verify this by viewing “Help > About” and ensuring that WORKFLOW is “True” within the License Parameters section:
- Your Aucerna Execute user must be assigned the “Manage Workflow Configuration” administrator privilege

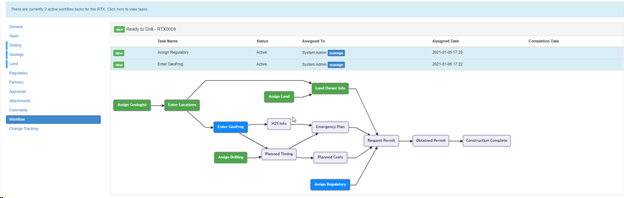
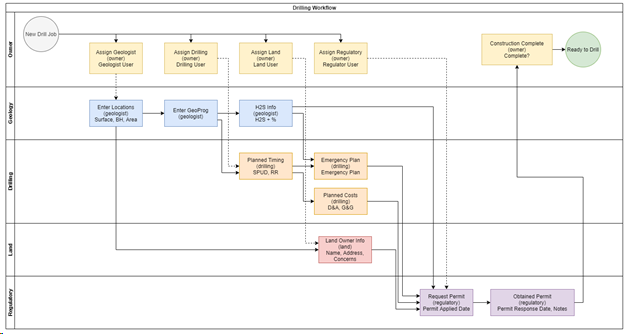
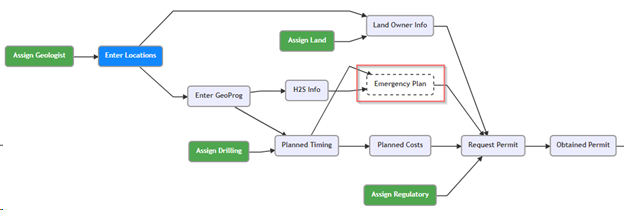
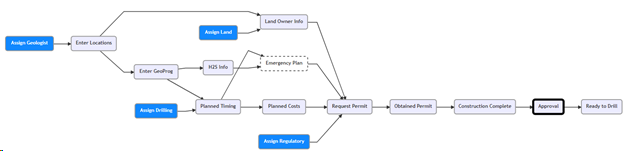
In addition, it is always best to start a new workflow with a plan (Visio, etc.) that details the flow and expectations for each task within the workflow. Here is a simplistic example that we’ll refer to throughout this document.
A workflow should be broken down into tasks. Tasks are a block of work or data that must be captured (usually by a single individual). Examples of tasks are:
- “Assign a Geologist to this Well”
- “Enter cost information.”
- “Create an AFE”
- “Enter Permit Information”
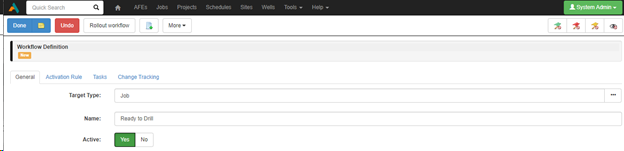
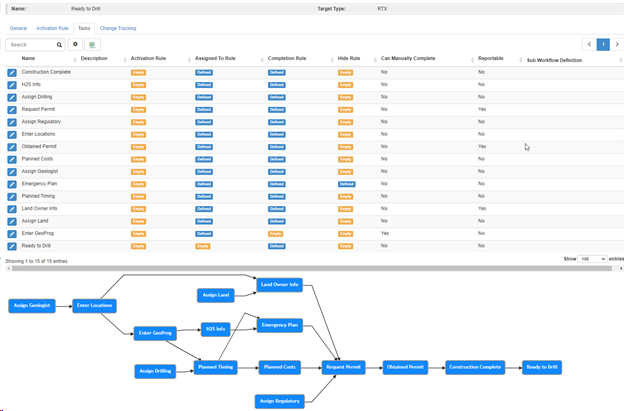
To create a new workflow definition, navigate to “Tools > Configuration > Workflow Definitions (view items)” and click the “Create New Workflow Definition” button.
A workflow definition is the template of tasks that define a specific workflow. You can have any number of workflow definitions in the system, and complex workflows can be broken into multiple sub-workflows. Examples of workflow definitions are:
- “Ready to Drill”
- “Ready to Drill – U.S.A” v. “Ready to Drill – Canada”
- “New Well”
- “Ready to Abandon”
- “Vendor Approval”
Editing a Workflow
Basic Workflow Definition Data
When creating a new workflow, you must first select the “Target Type” (or Document) that the new workflow will apply to. For example, A workflow definition with the “Target Type” of “Well” would automatically be created for new Well records in the system. This can never be changed.
Next, you must provide a Name (used to differentiate different workflow instances) and indicate whether this workflow definition is Active.
It’s usually a good idea, especially in production environments, to create new workflows as in-active and only activate them once the workflow has been completed to avoid accidents where you end up spawning thousands of new empty workflows on historical documents.
Activation Rules
The Workflow Definition’s Activation Rule defines the criteria when a new “instance” of that workflow is created. It’s probably best explained with a couple of examples:
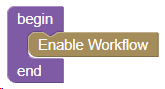
The following simple activation rule says, “create a new instance of this workflow immediately when a new Job is created” (note: assuming an instance of that workflow doesn’t already exist for this Job).
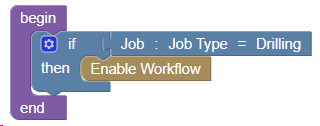
We can then modify the activation rule to be more specific. The following example is used to differentiate between different types of Jobs. This one says, “create a new instance of this workflow when a new *Drilling* Job is created.”
Activation rules can be complex and wait for certain conditions such as a status changing from “inventory” to “planned” or an activity scheduled to occur in the next 90 days, such as in this example:

When are Workflow Instances Created?
New workflow instances are only created if there is not already an active workflow instance (of the same Workflow Definition type) against the target document.
The system processes workflow definitions each time a document of the Target Type is saved. For each workflow definition, if there is not already a workflow instance of that definition on the saved document, and the Activation Rule is satisfied, a new workflow instance will be created against that Target Document.
The system will also periodically (nightly) review each Workflow Definition and finds any Documents that should have an instance of that workflow but don’t yet. This process is required to support Activation Rules that depend on the current date or status in another document. This process can be manually run (Tools > Synchronization; click “run” next to “Evaluate Workflow”).
Defining Tasks
Tasks are added/edited on Workflow Definitions on the “Tasks” tab. You can add any number of tasks to a Workflow Definition, although if you find yourself adding more than 50, you may wish to consider breaking your workflow into sub-workflows.
Task Basics
When editing or creating a task, you must provide a name to identify the task. The name should be short, descriptive, and uniquely identify the task (i.e. Names like “Geology Comment”, “Enter Prog”, “Create in WellView” are probably good names while vague names like “Comment”, “Approve” probably are not).
In addition, you may provide a description of a task. The description is information available for the administrator of a workflow to make notes to help clarify expected behaviour or workflow decisions. Task descriptions are not shown to the users of a workflow.

Task Dependencies & Activation
On a running workflow instance, only active tasks can be assigned to a user, and only active tasks will show up as needing to be completed.
There are two factors that control when a task is activated.
The first is the task’s dependencies. On the Task general tab, there is a list of other tasks on which this task depends. Until all of those tasks are complete, the task can not be activated. In the following screenshot, the task can not be activated until the “Assign Geologist” task is complete. A task can be dependent on any number of other tasks.

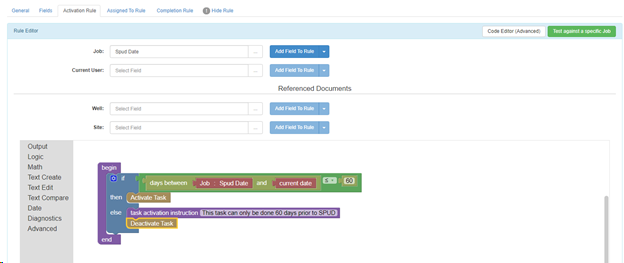
The second factor that controls when a task is activated is that task’s “Activation Rule.” The Activation Rule, if specified, is evaluated after all of the task’s dependencies are met. The following example will only activate the task if we’re within 60 days of SPUD. Most tasks won’t need an Activation Rule, but the Activation Rule does provide a great deal of flexibility if you need more control over when a piece of work is done.
Once a task’s dependencies (if any) and activation rule (if provided) are met, the task will be activated. At this point, the task’s “Assigned to Rule” will be evaluated to pick an owner for the task, and the task will now show as needing to be completed. The date which this happens is logged as the task’s activation date, and it, along with the task’s completion date, are available in the reporting system.
If a task has no dependencies and no defined activation rule, it will be activated immediately when the workflow instance is created.
Task Reporting
It’s important to be able to report on task status and timing information. This allows you to build dashboards on project status and measure workflow performance. However, because there are often so many tasks in a workflow, exposing all of those tasks (with their status, assigned user, dates, etc.) can be overwhelming. To help control this, each task has a “Reportable” setting, which can be used to highlight key tasks and milestones for easy reporting.

When a workflow task is marked as reportable, a new set of virtual columns (task status, assigned user, assigned date and completed date) will be available when running reports.
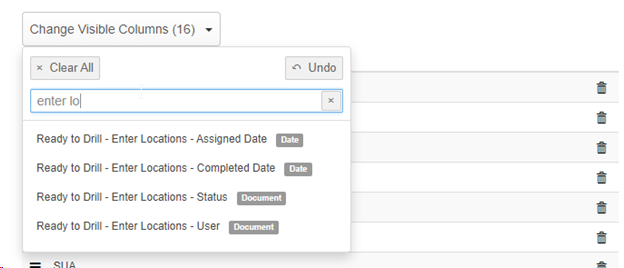
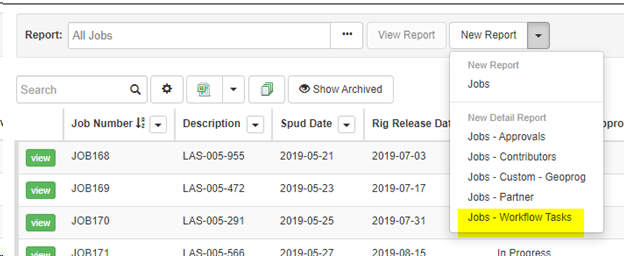
In addition to these, a new “Workflow Tasks” report type has been added, which gives access to detailed information (one row per task!) on every task in a workflow (regardless of the reportable status):
Task Fields
A critical part of the task configuration is identifying which fields are relevant for that task (both the fields you need to fill out, as well as key data you need to refer to). You provide these fields on the “Fields” tab of the task configuration.
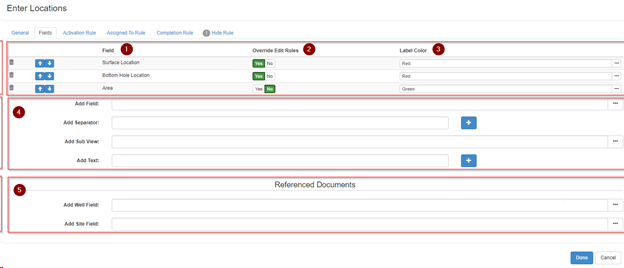
- You can add any number of fields to a task (both informational fields and required fields). You can also include fields from Referenced Documents and entire child tables.
- By default, the ability to edit the data in a field is subject to the normal field permissions. In some cases, it makes sense to ignore field permissions to ensure that the owner of a task can modify the field contents. “Overwrite Edit Rules” does this.
- Fields can be configured with a “Label Color” which can be useful for highlighting required or informational fields.
- Just like when configuring Custom Tabs, you can add fields, child tables, separators and text sections to your task field list.
- If the Target Type for your workflow has other Referenced Document types (for example, a Job is linked to a Well or Site), you can also add fields from those documents to the task.

Task Assigned
Most tasks, when activated, should be assigned an owner. The task owner is the person responsible for completing that task.
This is done by configuring the “Assigned To Rule” on the task configuration.
These rules can be as complex as you need, but the majority of the time, they are fairly simple. Here are a few common examples:
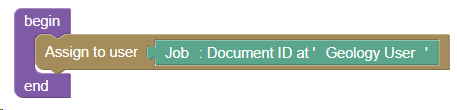
In the following example, I have a drop-down list of users on my Job called “Geology User” (part of the Teams tab). The intent here is that the owner of the Job will select somebody to wear the “Geology Hat” for tasks in this workflow. The following will assign the task to the assigned “Geology User.” One thing to note here is that the safest way to do this is to use the “Document ID” of the Geology User. This avoids potential issues where a name change breaks a rule.
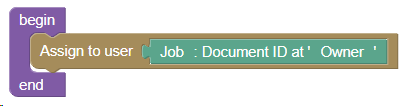
Another common example is to assign tasks to the Owner of the Job. This ends up looking almost identical to the above example.
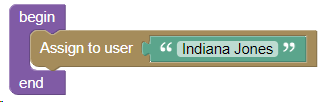
Sometimes we want to assign to a specific user in the system, and we can do that like the following. Here we can use the user’s name or email address. Note, however, that these rules will need to be updated if the user’s name or email address changes in the future.
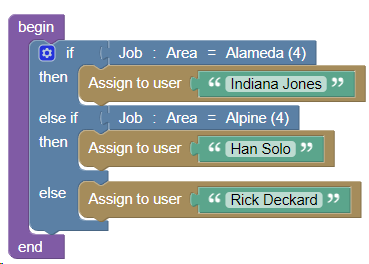
And, of course, we can build more complex rules that pick an appropriate user based on the Area or some other attribute.
Finally, sometimes assigning an owner to a task is unnecessary. Examples of this would include:
- Tasks whose completion requirements are met in an automated way. For example, I might have a task that waits for a job to be configured in WellView, and we have a synchronization that will periodically poll WellView checking for that data and filling in a status field in Aucerna Execute. Once the status field is filled in, the task will complete on its own.
- Milestones. Sometimes it’s handy to have empty tasks that immediately complete themselves as a way of capturing key milestones in the workflow. In these cases, there is no need to assign an owner since the task will always immediately complete itself once it activates.
In these cases, it’s fine to omit the “Assigned To Rule”, like so:

Task Completion
Once a task has been activated, it then becomes a candidate to be completed. Tasks are typically completed automatically when certain conditions in the underlying data are met but can also be completed manually for situations where that isn’t sensible (such as where the Task represents work being done outside of Aucerna Execute).

Task Completion Rules are able to look at any fields on the Target Document or Referenced Documents.
In general, completion rules are processed immediately when the Target Document is saved, so the workflow advances immediately. This is not the case, however, for rules involving date-based criteria (tasks that complete 5 days before the SPUD date, for example) or for rules referring to referenced documents. In those cases, completion rules are processed nightly.
The following is an example of a basic rule that requires both the Bottom Hole and Surface locations to be filled out. The Task Completion Instruction is a way to provide feedback to the user about what specifically is required from them in order to complete a task. This task will automatically complete once both the Bottom Hole and Surface location are provided.

Task Hide Rule
On larger workflows, it’s common to have tasks that don’t apply in all situations. For example, we might have a series of tasks that only apply to drilling sour wells. We can control these tasks by configuring a “Hide Rule”. A “Hide Rule” defines when a task should be hidden from the current workflow.
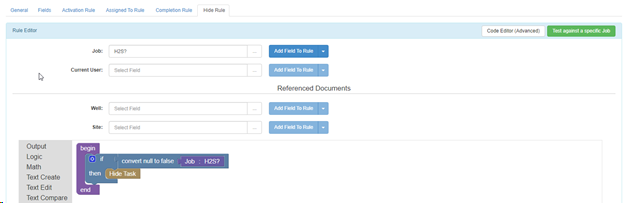
When a task is hidden, they’ll still be visible in the workflow diagram but with a dashed border like the following:
Hidden tasks are never activated, they are never assigned to users, nor will they block the activation of another task that they are a dependency to.
Throughout a workflow, the data used to determine if a task is hidden may change, which will immediately affect the visibility of that task (i.e. a hidden task can become active if the Hide Rule is no longer met).
Rolling out Updates to a Workflow
Changes to Workflow Definitions only affect Workflow Instances created after those changes are made. If you have current “in-flight” workflow instances and change the workflow definition, those workflow instances will continue using the workflow definition as it existed when the workflow instance was created.
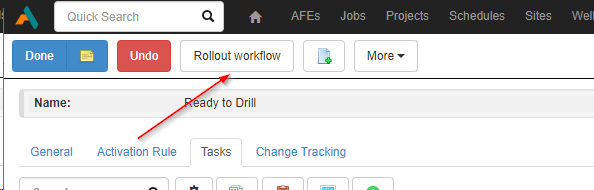
If you make changes to a workflow definition and would like to roll out those changes to all in-flight and active workflow instances, you can use the “Rollout Workflow” button after saving your workflow definition changes to roll out workflow changes. This will have the effect of adding newly created tasks, removing incomplete tasks that are no longer part of the workflow, updating rules, etc. Using “Rollout Workflow” will not affect any completed tasks, nor will it make adjustments to any completed workflows.
Sub-Workflows
Sometimes it is helpful to break up larger workflows into multiple parts. This can be useful for two reasons:
1) Limit the complexity/number of tasks within a single workflow. For example: rather than a workflow with 70 tasks that span multiple phases (inventory, prepare, approve, execute), we can simplify the main workflow to inventory > prepare > approve > execute, and then implement a separate sub-workflow for each phase, drastically reducing the overall complexity and simplifying management.
2) Reuse common workflow elements between multiple workflows. For example, I might have a common Approval workflow that applies to both my Drilling and Abandonment processes. I can break that Approval workflow out into a separate sub-workflow and then include it in each process.
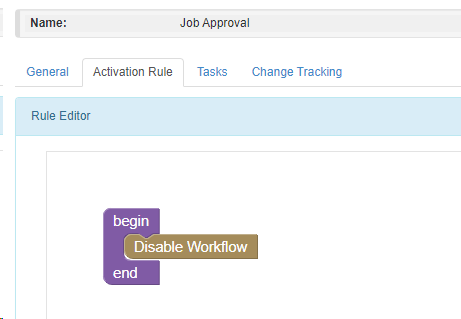
To create a new sub-workflow, create a new workflow as usual.
Ensure that the workflow is active, and the activation rule is set to “Disable Workflow” so that the new sub-workflow isn’t automatically created.
Add whatever tasks are required as part of that sub-workflow.
Now, you can create a new task on your main workflow and, rather than configuring a completion rule, select the newly create sub-workflow in the “Sub-Workflow” field.
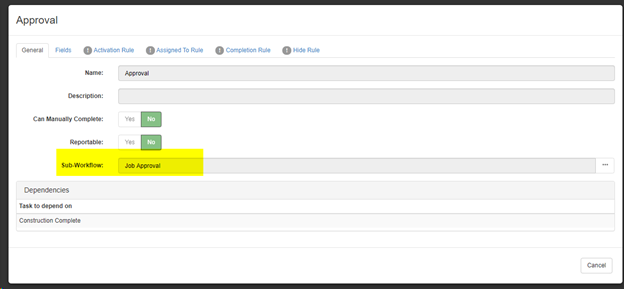
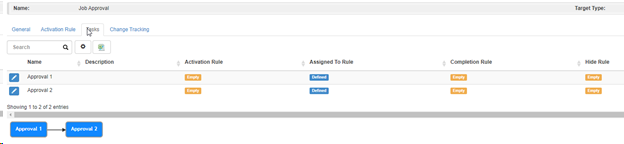
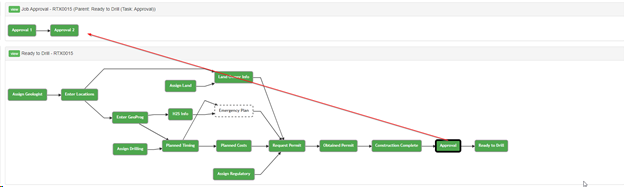
Now, when this task activates (because all dependencies are met, and the activation rule is met), a new instance of the sub-workflow type will be automatically created. When that workflow completes, that task will become complete and the main workflow will continue. When viewing the workflow diagram you can easily identify tasks with a sub-workflow because they have a thick bold border (like “Approval” below).
When sub-workflows have been activated, users will see them (and their respective workflow) on the Workflow tab:
Sub-workflows can be used in a variety of ways to simplify the management of complex workflows.